Kill methods – Surface Stack
We are shut in on a kick. Flow from the well stopped when we closed the BOP and after a period of time surface pressures had stabilised. We now need to get rid of the influx and regain primary well control so we can continue drilling. We need to kill the well.
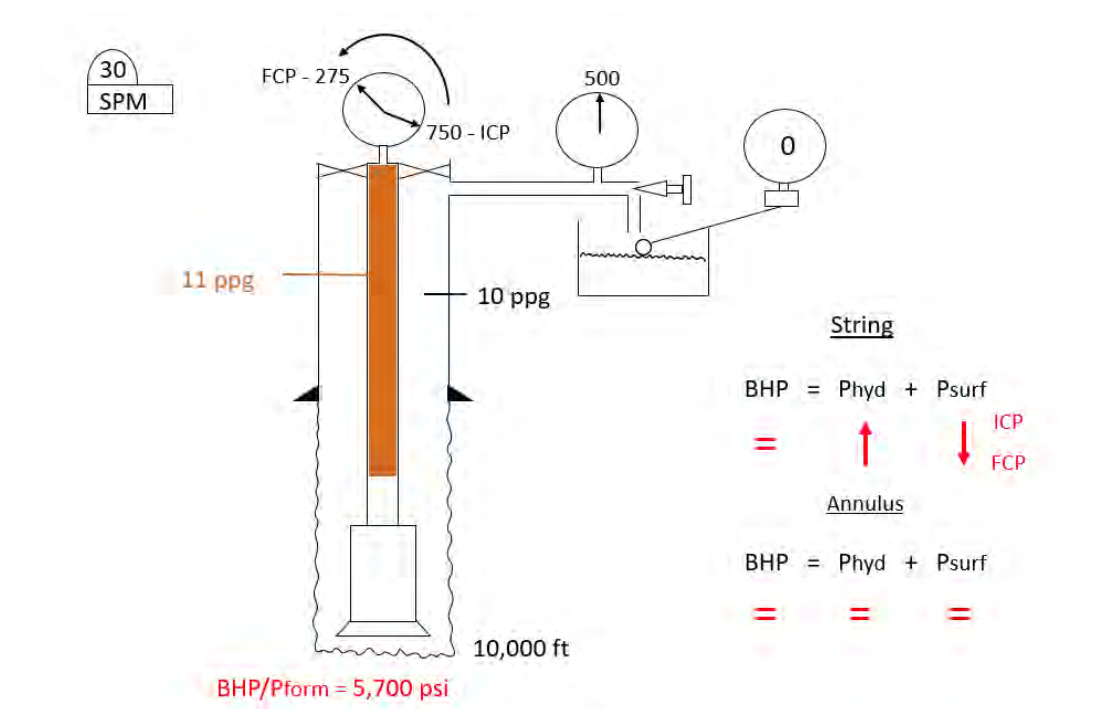
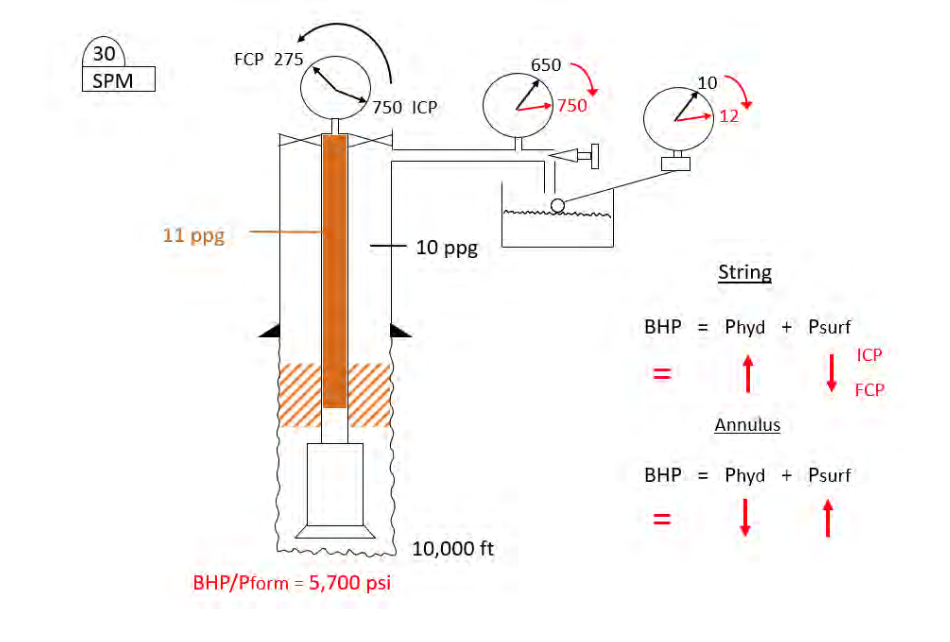
Here’s where we got to with our well:
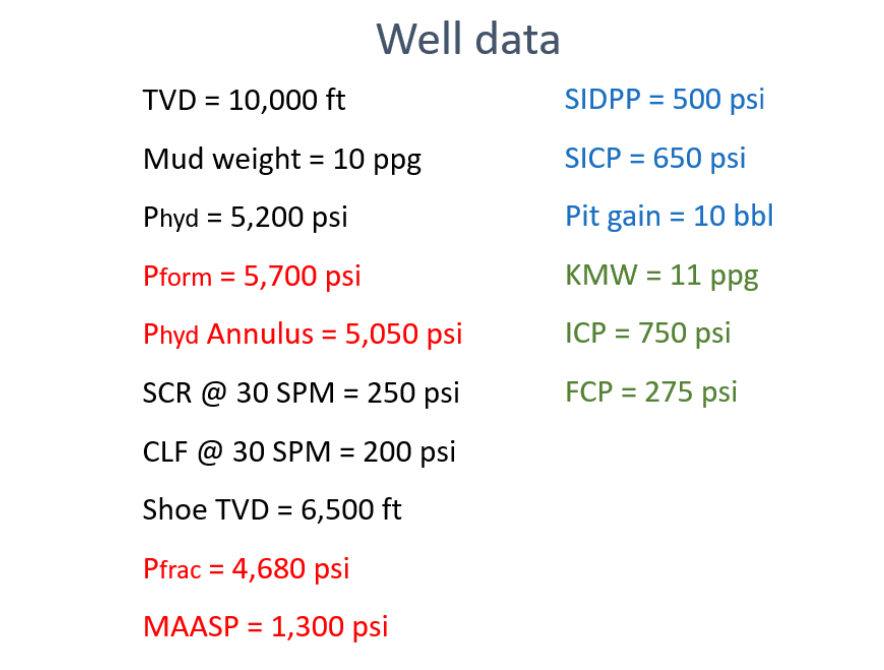
Did you figure out how we got the hydrostatic pressure in the annulus? With the well shut in and pressures stable the well is in balance. The U-tube is in balance. The pressure acting down both legs of the U-tube is the same – in our example 5,700 psi.
That 5,700 psi is made up of two things in each leg of the U-tube – the hydrostatic pressure in the leg and the reading on the gauge at surface – it’s how we worked out formation pressure in the first place using the hydrostatic in the drill string and the reading on the drill pipe gauge at surface (formula 4).
Looking at the annulus we know the reading on the gauge because we can read it, in this case 650 psi. The total pressure acting down the annulus right now is 5,700 psi (we have a balanced U-tube) so if 650 psi of that is on the gauge the rest of it must be hydrostatic pressure. There’s nothing else it can be.
Seeing as we are looking at the annulus let’s take a closer look at the shoe and what is happening there. Why? Well, the shoe is assumed to be the weakest past of open hole and therefore the part of the well that could be the easiest to damage or fracture.
How much pressure have we got to play with at the shoe right now? It’s straightforward to work out.
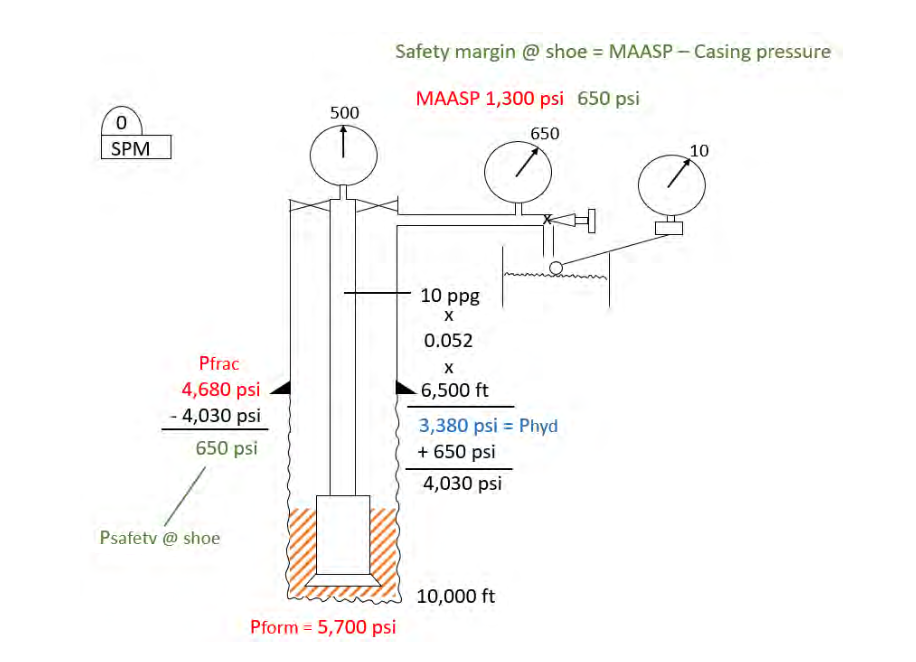
It’s a little bit unfortunate that safety margin at the shoe and SICP are both the same value right now but hey c’est la vie. Initial safety margin at the shoe is also a calculation on your kill sheet – the one after MAASP and this is what it is working out. Safety margin at the shoe is how much extra pressure could be applied to the shoe from above before you risk damaging the shoe.
During the kill we will keep an eye on what is happening at the shoe. We also need to keep an eye on what is happening to bottom hole pressure. In order to be able to do that we somehow have to be able to measure bottom hole pressure. So how do we do that?
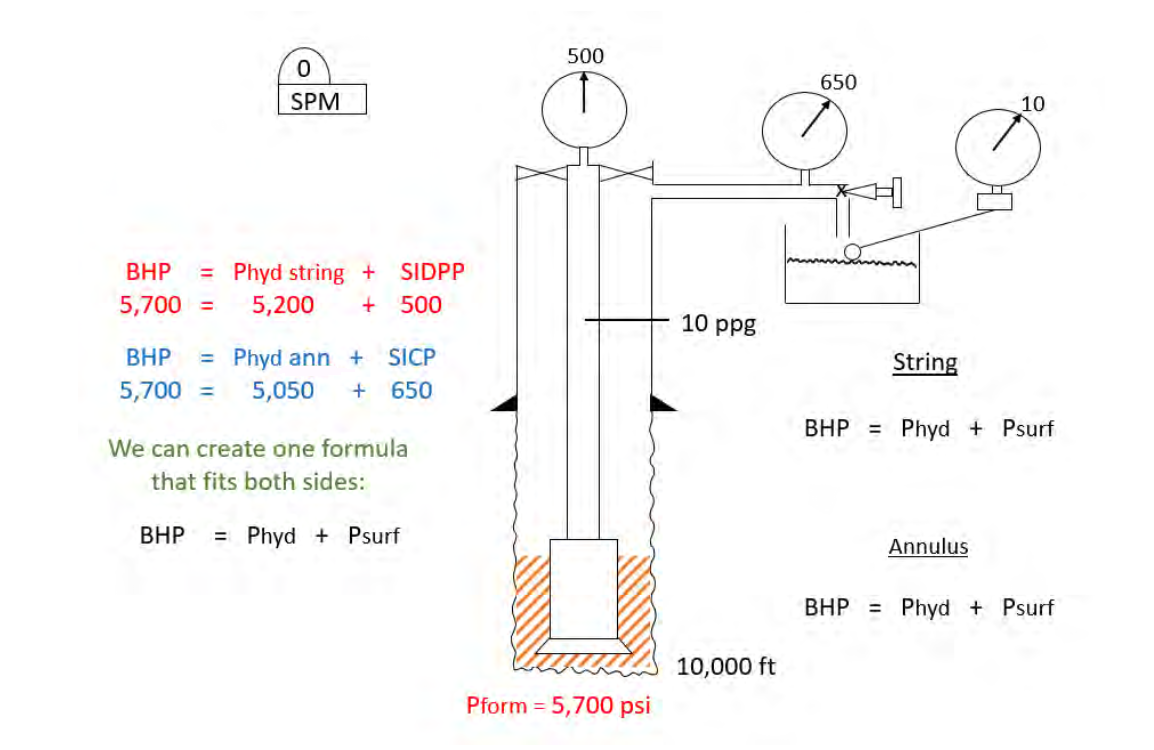
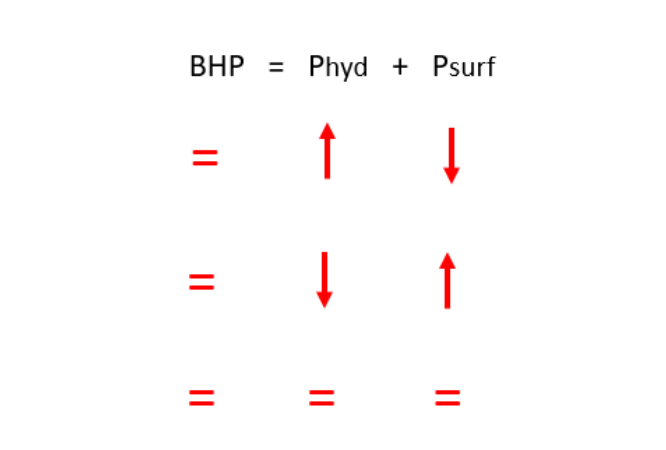
With the well shut in and surface pressure stable we have secondary well control. The well is in balance – bottom hole pressure and formation pressure are the same thing. We have a formula to work out formation pressure – formula 4 which says:
Right now, the well is on balance so we could change the words in the formula to say:
Right now, the well is on balance and we can look down the annulus to see that:
We could simplify the formula so it fits both sides of the well:
This is one of the most powerful formulas you can get for well control because it fits into so many different situations.
We will use this formula to help us control BHP during all stages of the kill because we know what we want to do, keep bottom hole pressure constant. We also know that if we are keeping BHP constant then only three things can happen during the kill, and they are all to do with hydrostatic pressure. It can either increase, decrease or stay the same. Surface pressure will then act accordingly. With this knowledge we can figure out if the kill is going correctly or not.
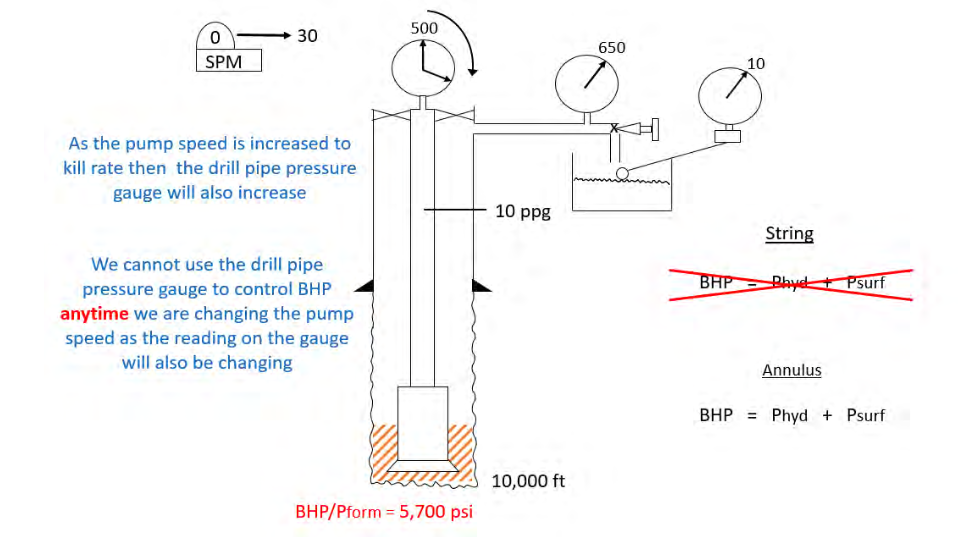
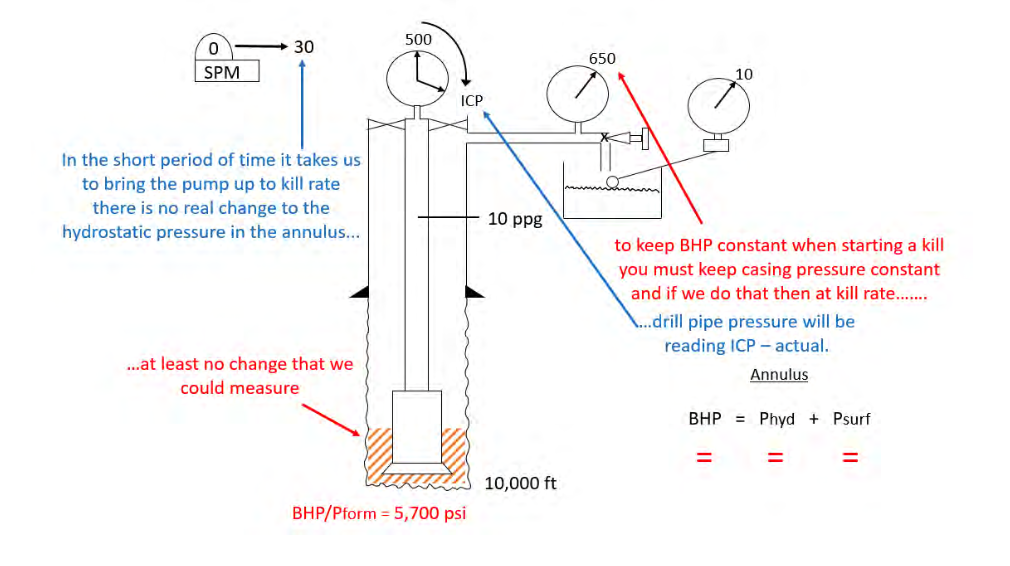
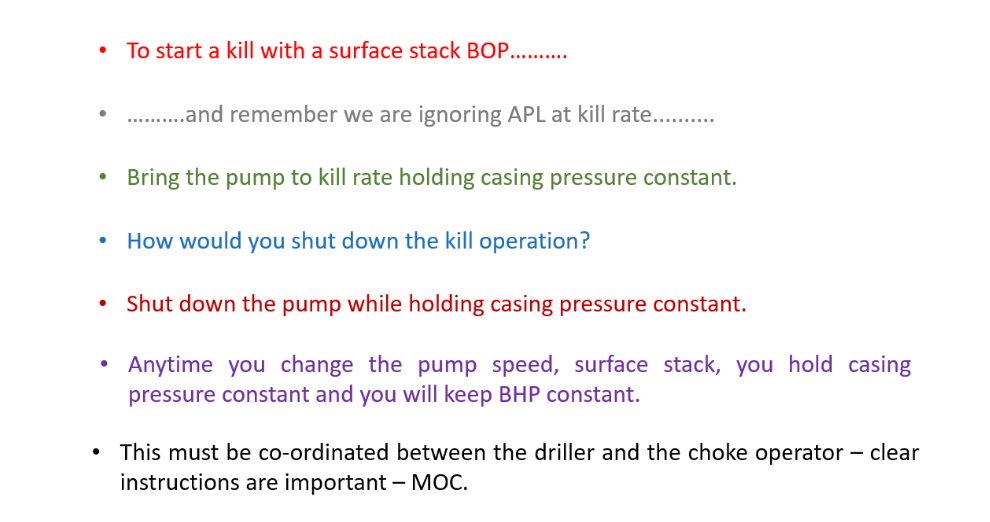
As we go through the kill methods, we will look at one side of the well or the other to control BHP, but we will also look at the other side of the well to make sure it is doing what it should be doing. First thing we need to do is start the kill by bringing the pumps online.
There are two standard kill methods that can be used to recover primary well control – namely The Drillers Method and The Wait & Weight Method. We will look at the drillers first.
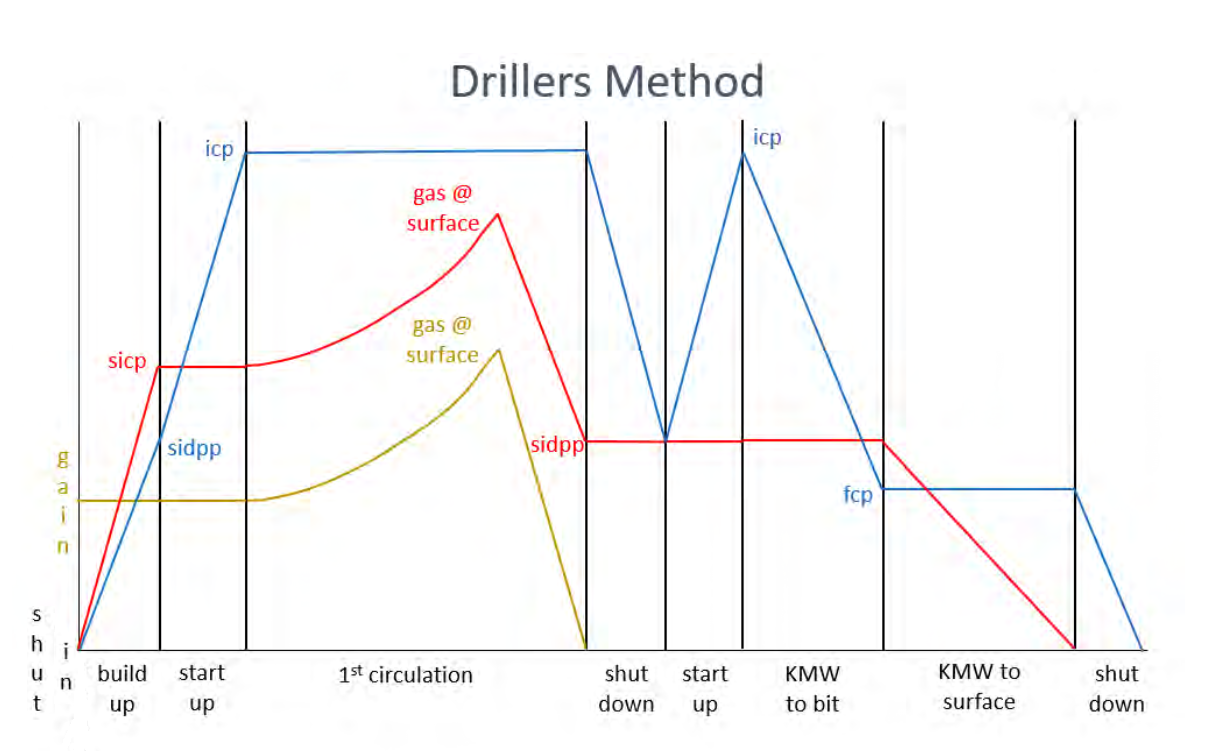
The Drillers Method requires two circulations of the well and can be summarised for a surface stack kill as:

As you can see the influx is removed from the well on the first circulation with the mud that is already in the well. It is not a kill method per se for a drilled kick as you do not restore primary well control during the first circulation.
During the second circulation you replace the current mud in the well with kill mud and thereby restore primary well control – you kill the well. Throughout both circulations BHP is kept constant (in the real word with a certain amount of overbalance depending on your shoe strength).
We start the drillers method kill the same way we always start a kill by holding casing pressure constant at SICP and when we get to kill rate the drill pipe pressure gauge will be reading ICP – in our case 750 psi as we add the circulating pressure (the SCR of 250 psi) to the underbalance (SIDDP of 500 psi).
We now switch over to the other side of the well to control the rest of the circulation. Given that there is no change to the hydrostatic pressure in the drill string (we are pumping current mud weight) then we simply keep drill pipe pressure constant as we circulate the influx up the annulus and then out of the well.
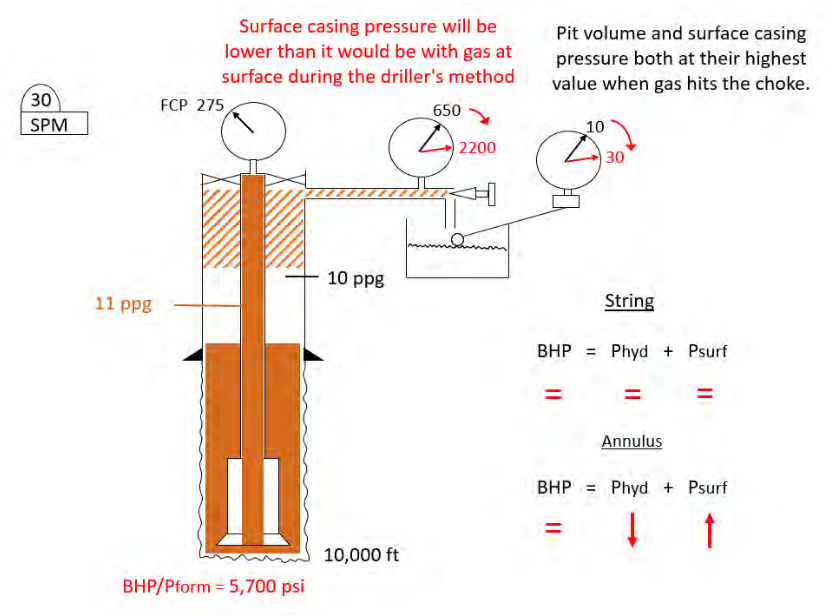
As the influx is circulated up the annulus it gets bigger in volume (we see this as an increase in our pit gain) and, apart from one specific stage, if we have more gas and less mud in the annulus the hydrostatic pressure in the annulus decreases. This reduction in hydrostatic pressure in the annulus causes casing pressure to increase.
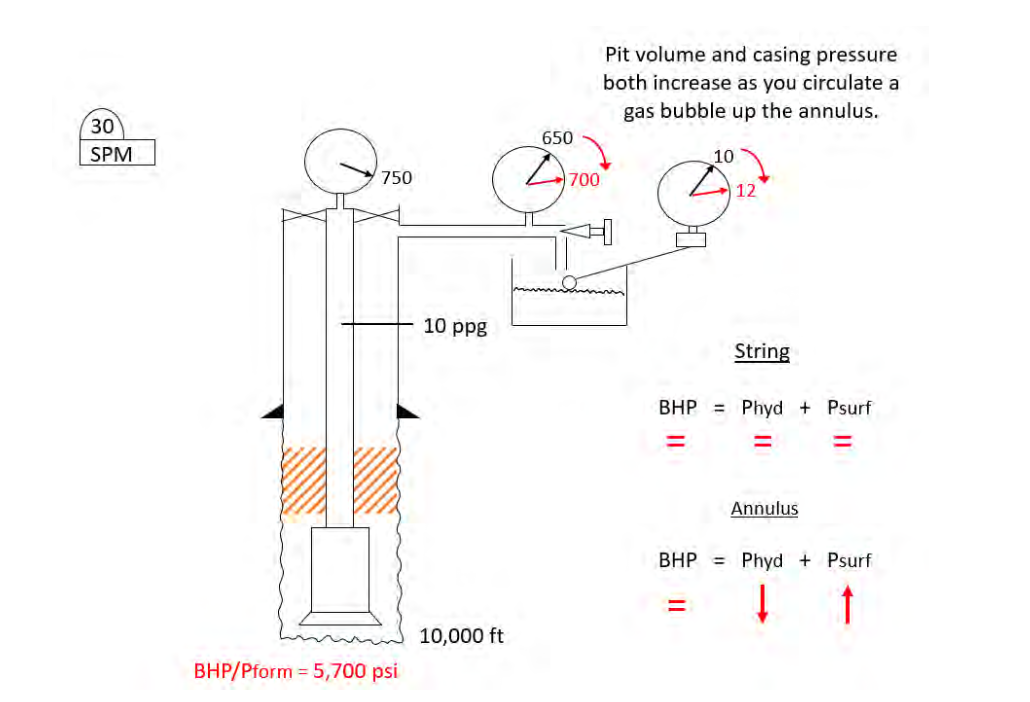
As the influx passes from the collar/open hole annulus to the drill pipe/open hole annulus it decreases in height (larger annular capacity) which in turn increases the hydrostatic in the annuus so casing pressure falls very slightly. This happens near the beginning of the circulation however and over the course of the circulation we see an increase in casing pressure at surface.
As we circulate the influx up the annulus on the first circulation of the drillers method we are keeping bottom hole pressure constant by keeping drill pipe pressure constant. The gas expands in size as we circulate it up the anulus and according to Boyle if you allow a volume of gas to get bigger the pressure inside the gas bubble goes down. More gas less mud in the annulus means surface casing pressure goes up. The pressures in the annulus act according to…IDS
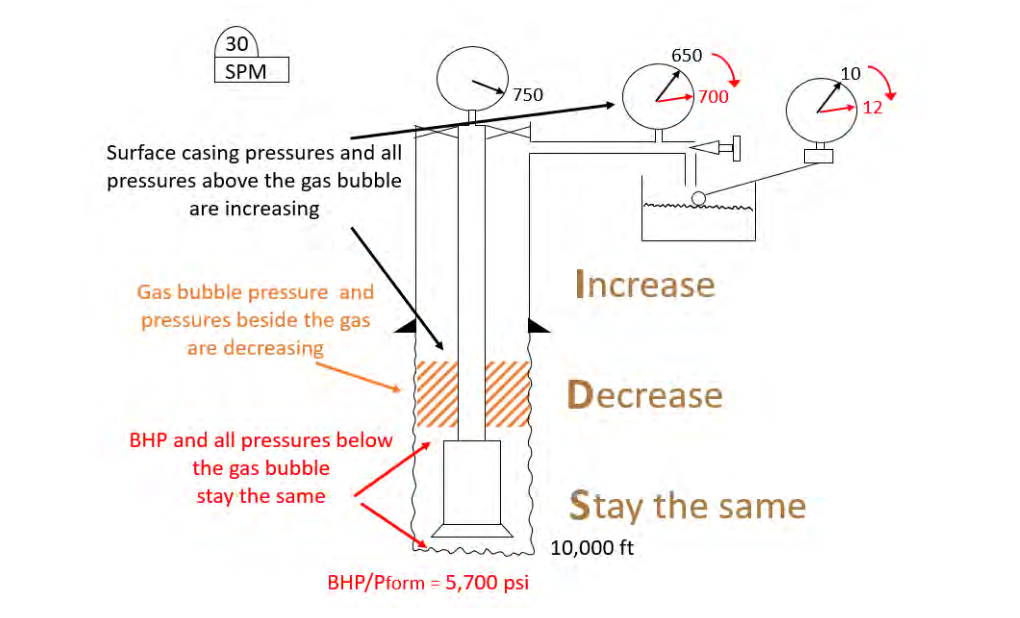
The pressure at the casing shoe (our weak point remember) also acts according to IDS as the influx is circulated up the annulus. While the influx is circulated up the open hole section towards the shoe then pressure on the casing shoe will increase. It will be at its greatest when the top of the gas reaches the shoe. As the influx enters the shoe then shoe pressure will decrease. When all of the influx has been circulated into the shoe (open hole strokes) the shoe pressure will stay the same.
MAASP is the maximum pressure we can apply to the shoe on the casing gauge at surface before we risk damaging the shoe. We track pressures at the shoe during a kill using the casing gauge. The difference between casing pressure and MAASP tells us how much extra pressure (safety margin) we could apply before risking damage to the shoe.
However once all of the influx has been circulated into the shoe then shoe pressure will stay the same as long as you are killing the well correctly – the shoe is now below the influx and IDS applies. This means that MAASP is no longer relevant to casing shoe pressure. Once the influx has been circulated into the cased hole section then surface casing pressure can increase above the value we call MAASP and not break down the shoe.
As the influx is circulated up the annulus towards surface the choke operator will be maintaining drill pipe pressure constant at ICP (plus any overbalance that has been taken). This will probably involve very occasionally opening the choke due to drill pipe pressure slowly creeping up as the gas gets closer to surface. Each kill must be conducted on its own merits however and choke manipulations must be based on what is happening.
Surface pit volume and surface casing pressure both increase as we circulate the influx to surface. Surface pit volume and surface casing pressure will both be at their greatest when the gas reaches the choke. Surface casing pressure may well be higher than MAASP but as long as it did not exceed MAASP while the kick was in the open hole then shoe pressure is still OK.
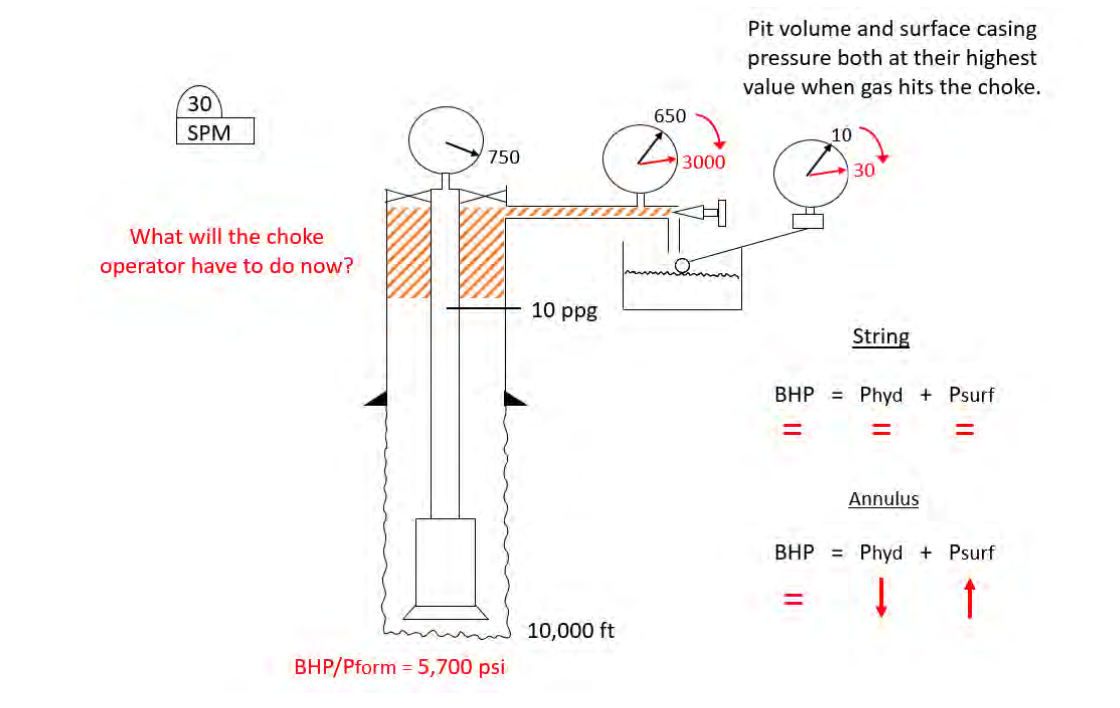
As the influx is circulated out through the choke then the pit gain will decrease. This means we are increasing the hydrostatic pressure in the annulus and surface casing pressure will also decrease.

When all the gas has been circulated from the well (minimum of bottoms up strokes) we will shut down the kill holding casing pressure constant (as we always do when changing pump speed with a surface BOP stack). SICP should equal SIDPP when shut in and in theory they should read original SIDPP.
Much more important than the theory is they are reading the same value. This tells us the mud column in the string and the annulus is the same – we have the same mud weight (or hydrostatic pressure) all the way round the well – meaning we do not have any influx in the well. The first circulation was a success if SICP = SIDPP with the pump off and the choke closed.
On the second circulation we are going to kill the well as we replace the old underbalance mud with kill mud thereby restoring primary well control. Our kill start up will still be the same (hold casing pressure constant). As we fill the drill string with kill mud we have choices.
We could continue to hold casing pressure constant - in this case at original SIDPP which is what it is reading at the end of the first circulation. This works because the hydrostatic pressure in the annulus is not changing yet. We could however, choose to move to drill pipe pressure and allow it to fall from ICP to FCP according to our pressure reduction schedule. This works because we are increasing the hydrostatic pressure in the string therefore surface pressure must decrease.
As kill mud is circulated to the bit on the second circulation of the driller’s method the choke operator should not need to adjust the choke to get drill pipe pressure to fall – why not? We are back to hydrostatic and U- tube. As we increase the hydrostatic in the string we knock the U-tube out of balance. The U-tube always wants to be in balance so the kill mud ‘runs away’ from the pump meaning the pump does not have to work so hard therefore drill pipe pressure (pumping pressure) drops on its own – no need to work the choke.
With kill mud at the bit the hydrostatic pressure in the string will not change for the rest of the kill so if we hold drill pipe pressure constant at FCP then we will keep BHP constant. Over in the annulus the hydrostatic pressure is increasing as we replace the old mud in the annulus with kill mud so surface pressure needs to decrease. How do we get casing pressure to fall?
Once again our old friends hydrostatic pressure and U-tube kick in to make us do the correct thing. As we put more and more kill mud into the annulus the pump must work harder causing drill pipe pressure (pumping pressure remember) to increase. We do not want drill pipe pressure to increase so we need to open the choke to maintain FCP. Every time we open the choke casing pressure falls which is what we want casing pressure to do.
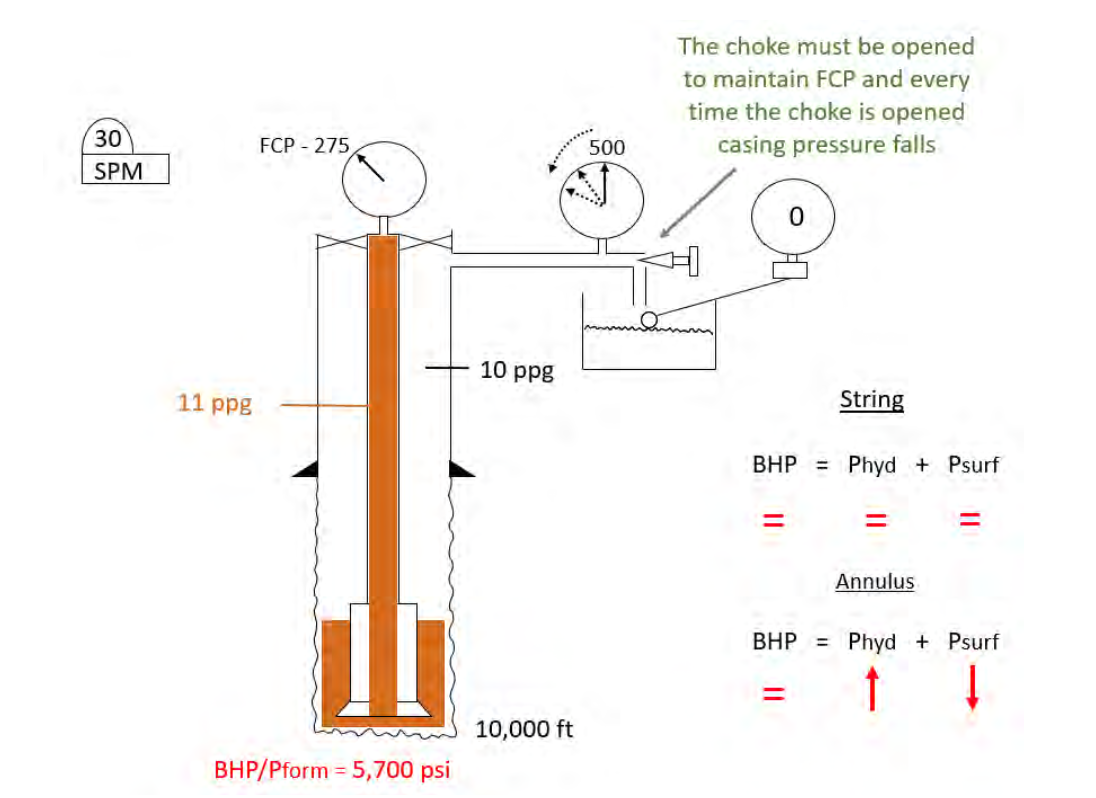
By the time we have kill mud back at surface the choke will be fully open, casing pressure will be reading zero and we will still have FCP on the drill pipe gauge. Shut down and check for zero pressures. With kill mud all the way round the well the well should be dead.
One small caveat. The drillers method kill described here is assuming the well has been killed on balance – BHP = Pform. It has described a perfect kill. In the real world you will almost certainly take some overbalance. It is important that when killing wells in the field you follow your own company procedures and react to changes in pressure according to those procedures.
One last look at The Drillers Method.
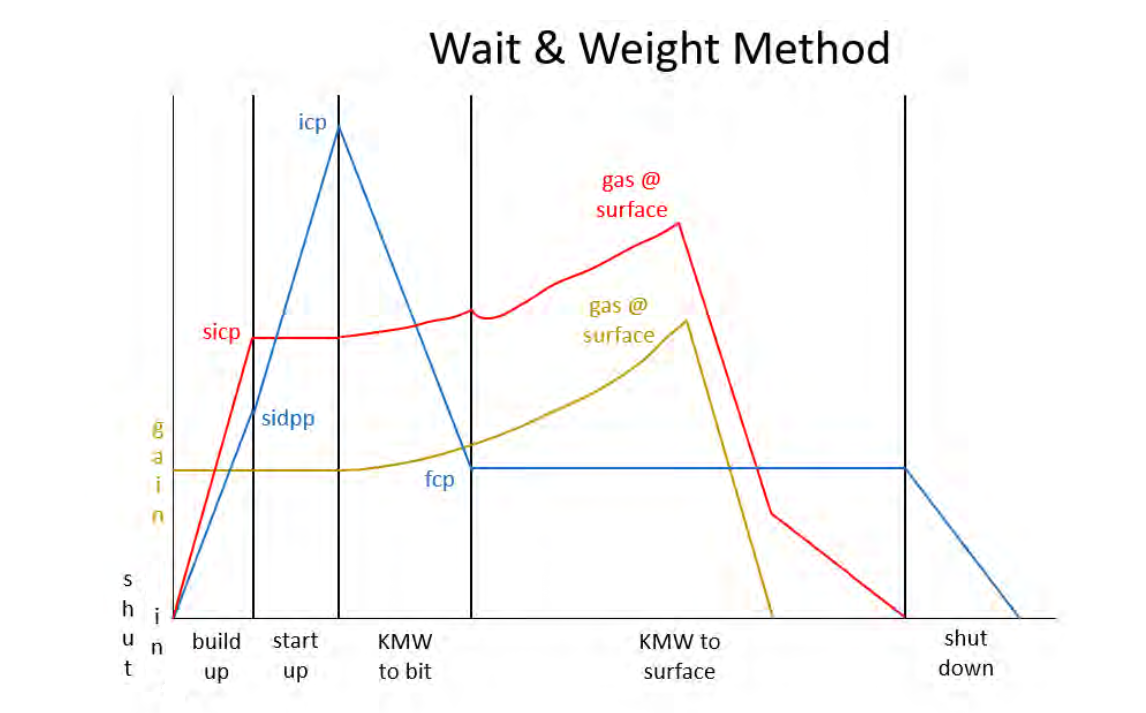
The other standard kill method is The Wait & Weight Method. You circulate the well once, removing the influx and pumping kill mud at the same time hence Wait as you Weigh up your kill mud.
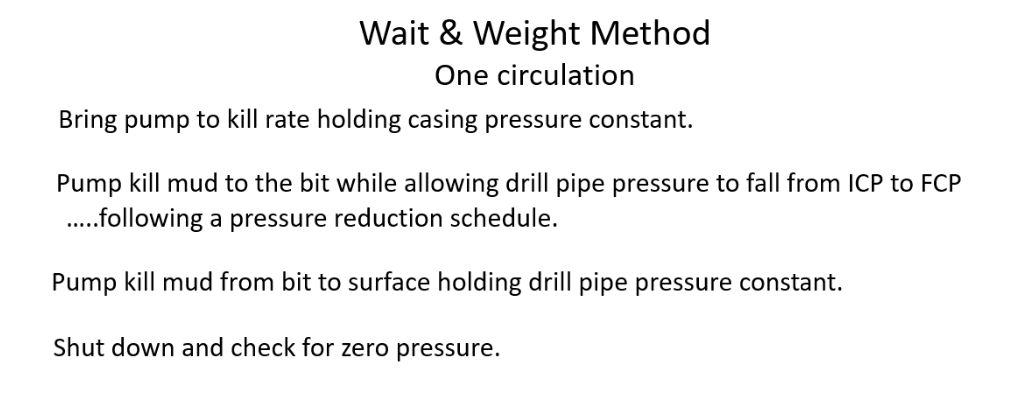
As you can see we are on drill pipe pressure throughout the whole kill (once the start up has been completed correctly) and therefore we must follow the calculated pressure reduction.
Kill mud will only start to kill the well when it is going down the drill string therefore it is important you know what your surface line strikes are. Zero the counter before you start pumping kill mud and then zero it again when kill mud reaches the rig floor. This is when your step down begins. BHP will reduce if you try and follow the step down schedule before kill mud reaches the rig floor.
As the kill mud is pumped to the bit the influx increases in volume as it is circulated up the annulus and we see an increase in pit gain. This increase in gas volume in the annulus reduces the hydrostatic pressure in the annulus so we see an increase in surface casing pressure (notwithstanding the short period in time when the influx goes from collar to pipe open hole annulus). Same as we saw with the driller’s method.
With kill mud at the bit, we have killed the string. If we were to shut down right now then SIDPP would read zero. We would not normally do this however.
As kill mud is circulated up the annulus, we stay on the drill pipe gauge and keep it constant at FCP to keep BHP constant. This works because the hydrostatic pressure in the string is no longer changing so keeping surface pressure on the string constant (drill pipe pressure) will keep BHP constant.
When kill mud is filling the drill collar to open hole annulus section the hydrostatic pressure in the annulus goes up slightly and we can see a reduction in casing pressure. Over the course of the circulation however, the gas expansion in the annulus reduces the hydrostatic pressure in the annulus and we still see an overall increase in surface casing pressure.
Surface pit volume and surface casing pressure will both be at their greatest when the gas reaches the choke. Pit volume will be the same as it would have been on a driller’s method kill. Surface casing pressure will be lower than the equivalent stage (gas at choke) of a drillers method kill however because you have kill mud below the influx with wait & weight meaning more hydrostatic and more hydrostatic means less surface pressure.
Throughout the gas evacuation and until kill mud reaches surface the choke operator should be maintaining FCP on the drill pipe gauge. By the time kill mud is back at surface the casing gauge will be reading zero, the choke will be fully open, and we will still have FCP on drill pipe.
Shut down and check for zero pressure.
One final look at The Wait & Weight Method